Wire shelving remains a popular choice for closets and pantries because it offers excellent airflow, supports heavy loads, and requires very little maintenance. However, dust, crumbs, grease, pet hair, and everyday dirt can quickly collect on the narrow wires and in the corners where shelves meet the wall. As a result, neglected shelves not only look dirty but can also contaminate stored food or stain clothing.
Fortunately, you can restore wire shelving with a few simple cleaning techniques. Moreover, regular maintenance prevents rust, extends the life of your shelves, and keeps your storage spaces looking fresh.
In this guide, you’ll learn exactly how to clean wire shelving in closets and pantries without damaging the finish.
Why Wire Shelving Gets Dirty So Quickly
Although wire shelving allows air to circulate, its open design attracts dust from every direction. Additionally, small debris falls through the openings and settles on lower shelves.
Common causes of dirty wire shelving include:
- Dust accumulation
- Food crumbs
- Flour and sugar spills
- Grease from cooking oils
- Sticky pantry residue
- Pet hair
- Mold caused by moisture
- Clothing lint
- Rust from prolonged humidity
Therefore, cleaning your shelves every few months helps prevent larger problems later.
Supplies You’ll Need
Gather your cleaning supplies before you begin.
You’ll need:
- Microfiber cloths
- Vacuum with a brush attachment
- Soft bristle brush
- Warm water
- Mild dish soap
- Spray bottle
- White vinegar
- Baking soda
- Old toothbrush
- Dry towels
- Rubber gloves
Avoid abrasive scrubbers because they can scratch protective coatings.
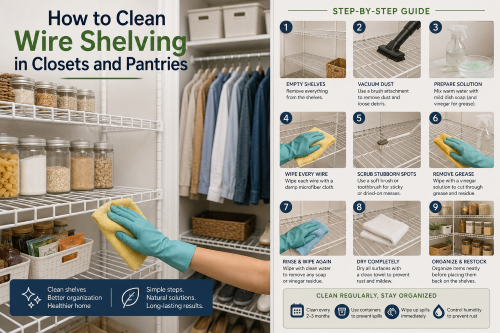
Step 1: Empty the Shelves Completely
First, remove everything from the shelves.
Place pantry items on a nearby table or countertop. Likewise, remove clothing, shoes, storage bins, and baskets from closet shelving.
While everything sits out, inspect expiration dates, donate unused items, and organize your belongings.
This extra step makes cleaning easier and helps reduce clutter.
Step 2: Vacuum Loose Dust and Debris
Next, vacuum every shelf thoroughly.
Use a soft brush attachment to remove:
- Dust
- Hair
- Cobwebs
- Crumbs
- Dirt
Pay close attention to shelf corners, wall brackets, and support rails.
Furthermore, vacuuming first prevents dust from turning into muddy streaks once you begin wiping.
Step 3: Prepare a Gentle Cleaning Solution
Mix a simple cleaning solution using:
- 2 cups warm water
- A few drops of dish soap
Pour the mixture into a spray bottle.
For pantry shelving with greasy residue, add one tablespoon of white vinegar.
This solution cuts through grime while protecting the shelf coating.
Step 4: Wipe Every Wire Carefully
Lightly spray a microfiber cloth instead of spraying the shelves directly.
Then wipe each individual wire from one end to the other.
Although this process takes time, it removes dirt much more effectively than wiping randomly.
Continue cleaning:
- Top surfaces
- Bottom surfaces
- Side supports
- Wall brackets
- Shelf edges
Meanwhile, rinse your cloth often to avoid spreading dirt.
Step 5: Scrub Stubborn Spots
Sometimes sticky spills refuse to come off with a simple wipe.
Instead of scrubbing aggressively, use an old toothbrush dipped in soapy water.
Work around:
- Dried syrup
- Cooking oil
- Sticky labels
- Hardened food
- Dust buildup near brackets
If necessary, sprinkle a small amount of baking soda onto the toothbrush for extra cleaning power.
However, avoid using steel wool because it may scratch the finish.
Step 6: Remove Grease from Pantry Shelving
Kitchen pantries often develop greasy buildup over time.
Fortunately, white vinegar helps dissolve grease naturally.
Mix:
- Equal parts warm water
- White vinegar
Spray the mixture onto a microfiber cloth.
Then wipe every shelf thoroughly.
Afterward, wipe again with plain water to remove any vinegar residue.
Finally, dry each shelf completely.
Step 7: Clean Closet Wire Shelving
Closet shelving collects different kinds of dirt than pantry shelves.
Instead of grease, you’ll usually find:
- Dust
- Fabric fibers
- Lint
- Hair
- Cosmetic residue
- Shoe dirt
Use the same soap solution while paying extra attention to shelf supports where lint gathers.
Additionally, clean storage bins before placing them back on freshly cleaned shelves.
Step 8: Remove Rust Safely
If you notice small rust spots, address them immediately.
Mix baking soda with a little water until it forms a thick paste.
Apply the paste directly onto the rust.
Allow it to sit for about 15 minutes.
Then gently scrub the area using a soft toothbrush.
Wipe the surface clean and dry it thoroughly.
However, replace severely rusted shelving because weakened metal may no longer support heavy items safely.
Step 9: Dry Every Shelf Completely
Never leave moisture sitting on wire shelving.
Instead, dry every surface using a clean towel.
Afterward, allow the shelves to air dry for another 15–20 minutes.
This step reduces the chance of rust and mold developing.
Step 10: Organize Before Replacing Items
Before putting everything back, organize your storage space.
For pantry shelves:
- Group canned goods together.
- Store baking supplies in clear containers.
- Keep snacks in baskets.
- Place frequently used items at eye level.
For closet shelving:
- Fold clothing neatly.
- Store shoes in bins.
- Separate seasonal items.
- Label storage containers.
As a result, your shelves stay cleaner much longer.
How Often Should You Clean Wire Shelving?
Cleaning frequency depends on where the shelving sits.
General recommendations include:
- Pantry shelves: Every 2–3 months
- Closet shelves: Every 3–4 months
- Laundry room shelves: Every 2 months
- Garage shelving: Monthly
- Utility room shelving: Every 1–2 months
Additionally, wipe up spills immediately to prevent sticky residue from hardening.
Common Cleaning Mistakes to Avoid
Many homeowners accidentally damage wire shelving during routine cleaning.
Avoid these common mistakes:
Using Bleach Regularly
Although bleach disinfects surfaces, frequent use can damage protective coatings.
Instead, stick with mild soap and water for routine cleaning.
Oversaturating the Shelves
Too much water can seep into brackets and encourage rust.
Therefore, spray your cloth instead of the shelving.
Ignoring Rust
Small rust spots spread over time.
Treat them as soon as they appear.
Using Abrasive Pads
Steel wool and rough scrubbers scratch protective finishes.
Instead, choose microfiber cloths or soft brushes.
Replacing Items Too Soon
Always wait until shelves dry completely.
Otherwise, trapped moisture may encourage mildew.
Tips to Keep Wire Shelving Cleaner Longer
Fortunately, a few simple habits reduce future cleaning.
Try these maintenance tips:
- Wipe shelves once a month.
- Store pantry items in sealed containers.
- Line shelves with washable shelf liners made for wire racks.
- Dust closet shelves during routine house cleaning.
- Vacuum nearby floors regularly.
- Fix leaks quickly to prevent moisture damage.
- Rotate pantry items every few months.
- Keep humidity under control.
Consequently, dirt builds up much more slowly.
Natural Cleaning Solutions That Work Well
If you prefer eco-friendly cleaning products, several household ingredients clean wire shelving effectively.
Excellent natural cleaners include:
- Warm water and dish soap
- White vinegar
- Baking soda
- Lemon juice for mild stains
However, avoid mixing vinegar with bleach because doing so creates dangerous fumes.
Final Thoughts
Cleaning wire shelving in closets and pantries doesn’t require expensive products or specialized equipment. Instead, consistent maintenance, gentle cleaning solutions, and proper drying keep shelves looking their best year round.
Moreover, regular cleaning protects your belongings, improves organization, and extends the life of your shelving. By vacuuming debris, wiping every wire carefully, removing stains promptly, and addressing rust early, you can maintain clean, sturdy storage spaces with minimal effort.
Whether you organize a busy pantry or a walk in closet, these simple cleaning techniques will help your wire shelving stay spotless, durable, and ready for everyday use.
Leave a Reply