
The Ultimate Guide to Descaling Your Shower Head Without Tools
Low water pressure ruins a morning routine. You expect a powerful spray. Instead, you get weak, stray needles of water. Consequently, mineral deposits cause this frustrating problem. Calcium and magnesium buildup clog the tiny nozzles over time.
Many people think they must disassemble the fixture. However, you can fix this without a single wrench. You only need basic household items and a little patience. Furthermore, this method protects your bathroom hardware from accidental damage.
Why You Should Avoid Taking It Apart
Old shower heads often feature brittle plastic. For this reason, turning them with pliers can cause permanent cracks. Additionally, internal seals may fail if you disturb them. You might create a leak that requires a plumber.
In contrast, chemical descaling works better than scrubbing alone. It dissolves the hard minerals from the inside out. As a result, you save time and protect your hardware. This method also reaches deep into the spray holes.
Gather Your Descaling Supplies
You likely have these items in your pantry already. Moreover, these tools provide professional results for pennies.
- Distilled white vinegar: This mild acid breaks down calcium.
- A sturdy plastic bag: Use a freezer bag for extra strength.
- Rubber bands or zip ties: These secure the bag in place.
- An old toothbrush: This helps clear away loosened debris.
- A microfiber cloth: Use this for the final polish.
The Step-by-Step Method
Follow these simple steps to restore your water flow. To begin, this process requires zero mechanical skill.
1. Prepare the Vinegar Solution
First, start by filling your plastic bag halfway with white vinegar. Do not fill it to the brim yet. Specifically, you must leave room for the shower head’s displacement. Otherwise, the liquid will spill onto your shoes.
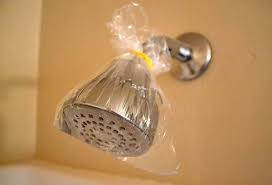
2. Position the Bag
Next, carefully lift the bag up to the shower head. Submerge the entire face of the fixture into the liquid. Simultaneously, ensure all the spray nozzles sit underwater. The vinegar must touch every clogged hole.
3. Secure the Bag Tight
Then, hold the bag firmly against the shower pipe. Wrap a rubber band around the top of the bag. After that, twist it several times until it grips the metal neck. Alternatively, use a zip tie for a more permanent hold. Check that the bag does not slide down.
4. Let the Acid Work
Now, you must wait for the chemistry to happen. Let the shower head soak for at least four hours. In fact, for heavy buildup, leave the bag overnight. The vinegar slowly eats away the crusty white minerals.
5. Remove and Rinse
Once finished, carefully slide the rubber band off the pipe. Remove the bag and pour the vinegar down the drain. Immediately, turn on the hot water. Run the shower for two minutes to flush out loosened grit.
6. The Final Scrub
Afterward, take your old toothbrush and gently scrub the nozzles. Small flakes of calcium might still cling to the surface. By doing this, the brush clears these final blockages easily. Rinse the fixture one last time with cold water.
7. Polish for Shine
Finally, dry the metal with your microfiber cloth. This prevents new water spots from forming immediately. Ultimately, your shower head should look brand new and spray perfectly.
Why Vinegar Is the Best Choice
Commercial cleaners often contain harsh fumes. Consequently, they can irritate your lungs in a small shower stall. Besides, strong chemicals might damage special finishes like oil-rubbed bronze.
White vinegar is non-toxic and eco-friendly. At the same time, it kills mold and bacteria while dissolving minerals. It costs very little compared to specialized plumbing sprays. Therefore, you can breathe easily while the vinegar does the hard work.
Handling Stubborn Buildup
Sometimes, one soak is not enough for years of neglect. You might see stubborn spots around the edges.
If the flow remains weak, repeat the process. In this case, use fresh vinegar for the second round. Warm the vinegar slightly in the microwave first. Basically, heat accelerates the chemical reaction significantly.
Check your rubber nozzles during the soak. For instance, gently massage them with your fingers through the bag. This movement helps break the bond between the plastic and the lime.
Maintenance Tips for a Clear Spray
Prevention saves you from future headaches. Regularly, you can keep your shower running well with minimal effort.
| Action | Frequency | Benefit |
| Quick Wipe | After every shower | Prevents water spots |
| Vinegar Spray | Once a week | Stops mineral buildup early |
| Deep Soak | Every six months | Maintains maximum water pressure |
Additionally, consider installing a shower filter if your water is very hard. These filters catch minerals before they reach the nozzles. In addition to better flow, you will notice softer hair and cleaner skin.
Common Mistakes to Avoid
Important to note, do not use bleach for this task. Bleach does not dissolve calcium or lime. Indeed, it can actually encourage some minerals to harden.
Avoid using wire brushes or metal scrapers. Instead, use soft tools. Metal tools will scratch your beautiful chrome or nickel finish. Soon, scratches provide a perfect home for new mold growth.
Never leave the bag on for more than 24 hours. Notably, prolonged exposure to acid might affect some delicate coatings. Stick to the recommended timeframe for the best results.
The Science of the Soak
Hard water contains dissolved rocks like limestone. When water evaporates, these minerals stay behind. They create a “scale” that acts like cement.
Acetic acid in vinegar creates a chemical reaction. To clarify, it turns solid calcium carbonate into liquid calcium acetate. Carbon dioxide gas also forms during this process. Thus, you might see tiny bubbles inside the bag. This means the cleaning is working.
Enjoy Your Revived Shower
A clean shower head changes your entire morning. Because of this, you get clean faster with better water distribution. You also save money on water bills. In short, clogged heads often cause high-pressure leaks in the hose.
Now you know the secret to a perfect spray. As shown, you never have to touch a wrench or screwdriver. Just grab a bag and some vinegar today. Undoubtedly, your plumbing will thank you for the gentle treatment.
Leave a Reply